Thursday, April 30, 2009

Dodge & Burn Like An Expert, With More Control

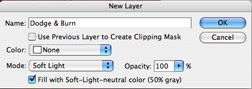
Black & White images can always use a bit of help with a little Dodging (to lighten) & Burning (to darken) in specific areas to improve the contrast and add extra impact. This secret weapon of master printers is no different today, than it was in the good ole' darkroom film days. Except now, it's easier, cleaner, there's no smelly mess and we also get an 'undo' button. Learn more right now.

The Dodge & Burn tools in Photoshop & Elements are OK, but they're not great, and they don't offer as much control as you'd probably like. So here's a way to have a simplier and more effective set of Dodge & Burn tools, with keyboard short-cuts that will have you zipping right along to creating your masterpiece.

1. Create a new Grey Layer. Layer>New>Layer. In the next window, choose Soft Light from the Mode drop-down and check the box 'Fill with Soft-Light-Neutral color (50% grey).

2. Select the Grey Layer and choose the Brush tool. Set the brush size as needed either at the Brush tools drop down menu or with the bracket keys ( [ & ] ), and choose an appropriate softness. Set the Brush opacity to 20% to start with. Press the 'D key' to set the paint swatches to their default colors of Black & White.

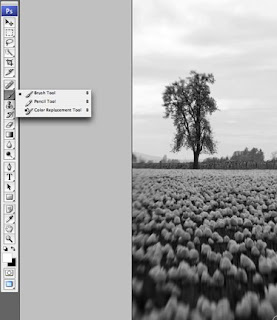
3. Start Dodging & Burning with your Brush. Set the Color Swatch to Black to Darken/Burn areas of your image & White to Lighten/Dodge other areas. Raise or Lower the Brush opacity for a stronger or weaker effect - Use Keyboard short-cuts to move faster: Press the 1 - 0 keys for a quick change of Brush opacity from 10% - 100% (example: pressing 5 = 50%, 3 = 30%). Pressing the X key will toggle the Black & White swatches for even quicker Dodging & Burning tool selection.

4. Bonus Option. For those of you using Photoshop CS or above, you can make an Action for the above technique, then assign that action to one of your Function F keys. Now, anytime you'd like to Dodge & Burn an image, simply press the 'F' key that you've assigned and Photoshop will automatically make the Dodge & Burn layer, choose the default Black & White swatch colors and select a 20% brush. Don't understand how to make an Action or have other things you'd like to learn? Email me or leave a comment.

Thanks again for reading,
Tony

Friday, April 17, 2009

Get Close, Get Happy


Have Fun! - Get Close!

By Tony D. Locke, MM


Looking for something new and challenging, now that the weather has turned somewhat better, on some days at least? Try your hand at close-up Macro photography. Anythings fair game, from the obvious flowers & bugs, to any odd household item in the junk drawer or garage. Just like the image above, which is a little metal 'knick-knack' box, about 3-inches square, with little beads weaved inside. Zoom in close and get to see the details you'd otherwise miss.


No special equipment is needed, and any camera can do it. You’ll be surprised how close you can get with everyday lenses. Granted, a DSLR with a specialty ‘macro lens’ and associated equipment will get you in closer and sharper, but give it a try with your existing equipment first, to see if you even like this type of photography before spending your hard earned money on new toys - As you continue to pursue each of the different aspects of this great hobby, you’ll find plenty of ways to spend your money, just ask anyone that’s been at it for awhile!


You can experiment with any focal length - Wide, ‘normal’, telephoto or even the lens included on your Point-n-Shoot. Each lens allows its own unique perspective on close-up photography. So, how close can you get? Most lens will have a “minimum focus distance” etched into the side of the barrel. While with Point-n-shoots, this spec will be listed in your owners manual. Try to get any closer and your lens will not be able to focus properly.


From there, it’s just a matter of experimenting, moving in and out to see how each lens works and what type of shots you can get. Extension tubes are an inexpensive accessory to look into. They’re simply hollow ‘tubes’ installed between your lens and the camera body, which reduce the minimum focus distances by moving the lens further away from the sensor, and allowing you to get even closer. Though you do lose a little light, so shutter speeds will be longer, so you may or may not be able to hand-hold.


Careful though - At these close distances, any slight movement on your part, or the slightest breeze on a flower (or scurrying bug), adds to the challenge of obtaining a sharp focus. Depths of field will also be measured in fractions of an inch, so a tripod becomes a very useful and highly recommended tool. Telephoto lens are handy for insects, as they’ll allow you to keep a safe distance - Not only so you don’t spook them and make them fly off, but so they don’t jump up and bite!


Lighting can include anything from a desk lamp, to flashlights or dedicated macro-flash. Camera flash doesn’t work very well though, as it’s going to shoot over the top of what your focusing on. Also, beware of shadows, including yourself and your camera.


Have fun, experiment, read, and go out and experiment some more. Have questions, email me, follow this blog, or go to my thatphotoshoppe.com website for more info.

Sunday, April 12, 2009

Cowboy Up Your Rodeo Shooting

Spring is almost upon us (at least in the Northern parts of the world), and with that comes the time to get out and start practicing your favorite sports to stay in shape and have fun - And your sports photography too. I'm one of those types that was never good at sports growing up, don't know why, I just wasn't meant to be, no matter how hard I tried. I can hold my own in Beach Volleyball & bike riding, but otherwise I suck. Oh well, I got over it long ago by being a lot smarter than the 'jocks'. I do enjoy watching others that are good at it though, and plan on working at taking more photos of them doing it too.

Now rodeo - That's just as much a sport as it is a rush for thrill seekers. Growing up as a "long-hair-hippie-rock-musician" during the 70's (and yes, enjoying everything "the 70's" was known for), rodeo was not something you'd find me doing. But, if the rest of my long-hair friends weren't paying attention, I'd sneak off and watch one once in awhile, if for nothing else than the spectacle of "...what the @#$% are these cowboys trying to do"?!! I don't pretend to understand how they do what they do, but I can understand - and respect, the skill and guts it takes to get on top of a pissed-off bull and go for a ride.

Unfortunately I wasn't a photographer then (just a long-hair rock musician that was smart & sucked at sports), but I am today.

So, here's a few tips I've compiled on how to get some great shots of those crazy cowboys as they enjoy their thrill seeking sport.

1. Use your ISO to its best benefit - Faster shutter speeds in low light. This is not a slow sport! Set you camera to Shutter Priority. If you're lucky enough to be outside in the daytime, instead of an inside arena, you may have enough sun light to get by with lower ISO's, but if not, bump it up to keep your shutter speed in the range you need to stop-action the events happening in front of you. You'll also, more than likely, be hand-holding your camera with a long lens too, so fast shutter speeds are important. At ISO 400 you should be able to keep the noise down and get 1/1000 sec at f8 or so on most sunny days, jump to ISO 800 and you'll gain another stop or two of shutter speed, and/or bump to f11 for a bit more depth of field. Though on most rodeo action you're more concerned about freezing action than what's at the other side of the dirt. But, on the other hand, that added depth of field could help if your auto-focus locked on the bull's nose, instead of the rider's. At least hopefully they'll both be in focus now. Experiment with how your camera's ISO range affects noise. Some are better than others of course, but a bit of noise is generally preferred over a missed action shot. And, that extra noise can add a bit more grit to the grit of cowboys.

2. Go Long - That is with your lens of course. You're going to want something in the 300mm f4 range for the most part, as most arenas are at least 50-60 yards or more across. A good zoom in the 70-300 range should do fine, especially when the action moves close to you, you'll appreciate the ability to zoom back too - Just be careful if the action suddenly appears as if it's going to land in your lap (since you are looking at it thru a telephoto), and you jump back into something, or someone you probably don't want to meet by accident. Which brings up another important rule for rodeo - Watch were you walk! Do the terms 'road apple', 'cow patty' or any of the other many names for fresh 'animal droppings' come to mind?

3. Start small & local. Your local small town rodeo is a much easier place to start learning how to shoot, than one of the big county or state championships. It'll probably be daytime, and you'll generally have no problem getting right on the fence - That much closer to the action, smell and dirt of this exciting sport. Again, pay attention to your surroundings, those are some damn big animals. Which, for the most part, are mad because either some fool is sitting on them or has jumped off their horse and is trying to wrestle them to the ground. These animals are moving as fast as they can to try and eject that cowboy (or girl), and/or get away so now they can chase the cowboy and stomp on 'em. Which is when the rodeo clowns come out - More opportunities for some great actions shots. All part of the sport - Hey, the animals what some fun too!

4. Auto auto-focus. Set your camera to 'servo', 'continuous focus' mode, or whatever your camera calls it, if you can. This mode will continue to track the action and constantly adjust your auto-focus as you're holding your shutter button, up to the point you push to trip the shutter. Remember, focus on the eyes, mostly of the rider, but the horse they're on or the animal they're wrestling with can provide some great expressions too. With a bit of practice, you'll be able to 'focus and recompose' too, framing the action for better compositions.

5. Keep clean. Not just clean shots, but clean equipment too. Make sure you have a lens hood attached. This will not only reduce the possibility of flare, but it will help in the protection of your lens glass from the impact of flying dirt chunks. Besides, it makes you look more professional and legitimate, so people will allow you more space for shooting (or bug you with a million questions about your gear). A UV filter is recommended too for that same cleanness and safety. Keep a small lens brush in one of your pockets, handy for those times you need to wipe off the dirt clods that made it in. One of those that look like a retractable pen are great. A lens cloth may scratch if the clods are fine or sharp, but you'll want one handy just the same. Another rag to wipe yourself off now and then will come in handy too, this is a dirty sport - Just make sure you don't mix it up with the lens cloth when you go to wipe off your glass!

6. Have Fun! Enjoy the spectacle, the food, drinks and the crowd - Which are always good for a few great candid shots too. Very Important - Don't try to touch (or hop on) any of the animals without asking for permission and instruction first. And, no matter how cool they look, don't buy a cowboy hat & boots unless you can really pull off the look and attitude that goes with it. It'll just make you look silly and piss off the real cowboys! And, I'm sure if they could, the rodeo animals would enjoy a laugh too if the saw you walking by.

Enjoy, Thanks for reading along,
Tony

Tuesday, April 7, 2009

Hello!
Great News - I just had my first sale of an image from one of my web-sites. This "Rusty Scissors" image was just sold for use on the cover of a new book being published in Greece, in Greek, called "O Raftis tou Poseidona" (The Tailor of Neptune). Along with the "use" price, I'll receive credit on the inside back flap and two copies of the book.
I've had several of my images sold in my store, both framed & unframed and on ceramic tiles as 'fine-art' and chosen for corporate art (prize trophy & sponsor thank you plaque's for golf tournaments, etc.), but this is first from my Flickr site.

And Now, For Something Completely Different - 101 Photoshop Tips In 5 Min By Deke