Thursday, March 26, 2009

Updates & Extra Credit For Magic Squares

Hello again. I've heard from several readers, that the "Magic Squares" project was 'interesting, but too much to figure out' - Sorry about that. I wanted to present a fun challenging way to create a unique version of one of your images. If that one was difficult due to the number of squares, try again, but this time only make four squares. It will still look great, and be much easier to build. I'll make the next one a bit easier - maybe.

Now, for some extra credit to those of you who (whom?) enjoyed the last project, here's how to make it more unique. First, if you didn't like how the Stroke along the outside turned out after setting all the layers, go back to any one of them, double click on the fx icon on the layer, make your changes, then do the 'Copy layer style/Paster layer style' technique again to each of the layers.

Next, lets rearrange the order of the layers to control/change the overlap of each of the squares. Remember, the squares/layers are stacked, from top to bottom. Any layer that's on top, will go over the square/layer below it. You can rearrange to your hearts delight to create overlaps as desired. This allows you to have some squares under one or two of its neighbors, but overlap one or more of the others. Look across the bottom of my image for examples.

This can be done wether you've got 20 layers or 2. The final look is up to you.

That's today's post. Email any questions/ideas/comments.
Thanks for playing.

Sunday, March 22, 2009

That Magic Squares Trick


Isn't that just the niftiest thing you've ever seen? I made it myself, and I'm about to tell you how so you can do it too.

This is another in my series of Photoshop & Photography tricks that I'm going to add to my blogs. This is mostly for CS2 and above, but it may be doable in Elements with a few work arounds. This is an image that I took some time ago, then played with in CS3 to make it look like a kinda mosaic or bunch of small photos laid on the table, puzzle fashion, to make the larger image appear. There are several ways of doing this, which are similar to the "out of box" look that many, including myself, like to play with, but just handled slight different. I'll describe that "out of box" trick in another post.

I'm not sure if I'll be able to completely describe how I did this image, so that it makes sense to anyone but me, but I'll give it a try. If anything, you'll at least have a good time reading this, and a starting point to experiment - Which is what this fun craft of Photography and Photoshop is all about, ain't it?

Alrighty now, on with the lesson. Before we begin - Remember back in Grade School, how you were taught to always duplicate your image first, and rename it so that if you totally bugger this image up, you'll have that original safe image, still sitting there with a smiley little grin. Do it now! Don't worry, we won't watch. I know, I know, some of you will probably ignore this sane bit of advice, thinking you know better - But you're probably the same kids that were told that it's really not a good idea to shove those Monopoly pieces up your nose, but you did it anyway. You were wrong then too, so again, just do as your told!

Essentially, you draw each of the squares by making a selection with your Marquee Tool, right over the top of the image. It may help to pre-draw the location, angle and number of squares on a piece of paper first, so you'll have an idea of how they'll layout. Put each piece of the main image that you've selected on it's own layer - Layer>New>Layer via copy, or Comm-J/Ctrl-J. As you're drawing each of the squares, hold the Shift key to produce a perfect square and have your Info Window open (View>Info) so you can verify the sizes match as you're dragging your mouse. That is of course, if you would like all your squares to be the same size. I dunno, you're the artist here, maybe mixing up the shapes looks cool too. I've got other images where I've done just that, with varying levels of success, or not - Experiment is the word of the day.

After you've got all the sections selected and placed on their own layers, select the background layer and turn off its Visibility Eye (the little eye icon to the left of the layer), which is like hiding it. Sha-zamm! You've now got the beginnings to this magic looking piece of art. If needed, go back and tweak, and/or redo any selections that don't quite look right by repeating the above paragraph.

Now, with the background layer still selected, click on the Adjustment Layer button (you know, that Ying-Yang looking circle) and chose Solid Color (or Pattern, or Gradient - Again, you're the artist here - But for now, solid color's easier to explain). Since you had the background layer selected first, this new layer will appear above it, but below all your pretty squares. In the next window, chose a color you like and hit OK, this will become your new background below all the squares. On mine, I also added a Pattern Layer above the color to add some texture, so just repeat the last sentence and play with the Opacity of that layer as needed. I've also added an additional canvas extension, with a complementary color to mine too, which if you're so inclined, you can do too. It's under Image>Canvas Size. Turn off the "Relative" box, type in the size of extra Canvas you'd like and hit OK. Remember, it's going to be spread across both sides, so if you'd like 1 1/2" added to each side of your image, type in "3" on the height and width.

Looking good now, aren't we? Well, hold on Bucko, you've still got a bit more work to do before heading over to that blender filled with enough tequila and ice to stun an elephant.

Select one of the square's layers, then click on the Layer Style button, which is the small fx button at the bottom of the Layers pallet, and chose Stroke (in Elements, you'll have to dig around to find the Style features, as it's slightly different in each version, and it's been awhile since I've done this in Elements). Now you get to chose a Stroke color (the line around the outside of each square) and thickness. On the pop-down, chose Inside. I've stayed with White here, and increased the width to something that looked pleasing. OK, while you still have the Layer Styles window open, chose Drop Shadow, making sure Global Light is checked (this insures that all shadows will go the same direction, which is after all, how nature intended it), add a bit of drop shadow to your square - Now remember, like any other seasoning, you add enough for good taste, but not so much that others could get sick. Go ahead and do these steps with your image now... We'll wait. When you're done, hit OK. Next, you get to Ctrl-Click on that layer (Or Right-Click for those of you on PC's that rhyme with Blindoes) and choose "Copy Layer Style", then go to each of the other layers, Ctrl/Right-Click and chose "Paster Layer Style", which, if you've properly followed along so far, should produce a pretty border and shadow to all your neat little puzzle squares, exactly like the first one you made.

How's it look? Isn't this a fun and pretty thing you've made now? I bet you're so excited you can't wait to chose another image to try it again. But first - You need to print this one out and hang it on the fridge with one of those lovely magnets you picked up in Las Vegas, just to make a mother proud.

Well, that's the jest of it. It's not one of the easiest or quickest Photoshop tricks, but fun. So, you may need to tweak, adjust, say a few 'choice words' to your screen if things aren't going as you'd like, experiment some more, go get a drink of something strong (like that blender full of tequila and ice that you told me about earlier), come back, maybe read your emails or some humorous web-sites, then get back on that Photoshop horse and try again until you get something you like.

My next step for this image, since we also print photos onto ceramic tiles at That Photo Shoppe, is to print each of these squares onto individual 4" square tiles, and mount them as they're laid out here, to a colored background, with maybe a watercolor paper or fabric below them - That's the next experiment. If it works, I'll post a picture of it here. If not, I'll punt, then join you for that drink.

Thanks for reading along, let me know if you have any questions/suggestions for future posts,
Tony

Friday, March 20, 2009

It Workie

Hey Look at me! I've figured out how to insert photos! Now the next step is if I can figure out the formatting of the image and text so that they fit together on the page

Buddha Dudes Chatt'n

This is a combination of two of my hobbies/trades - Bonsai and photography.
These are 'mud-men' that are used as decorative accessories around bonsai trees. I've had up to around 35 trees at one time, but generally lose at least one or two each winter, despite trying to keep them protected, then I'll add a new one or two the next spring, just to lose another one again. It's a fun, but slow and sometimes frustrating hobby.
I've got these types of "Buddha Dudes", as I've always called them, on several of my plants around the yard. This is a close-up Macro shot of them discussing the worlds issues, while having a little something-something to smoke. They're actually only about 1 1/2 inches tall.

30 Minute Star Trails "How To"

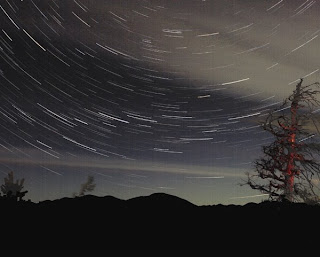
A 30-minute star trail, shot from Sun Mountain in the Cascade Mountains, at about 4,000ft, with snow, 20 degrees and wind blowing up my jacket.
But it came out very nice. It's actually 60 - 30 second shots combined as layers in CS3. This technique reduces the noise that's normal with a long exposure. While shooting, you add one 'black' shot at the end too (I just hold my hat over the front of the lens), which also helps in the noise reduction later in Photoshop.

Make sure you have a good flashlight (or torch for our friends across the pond), and make sure you have a fresh battery in it and your camera. A 1/2 hours worth of shooting every 30-sec will drain it dry. Find an area with an interesting foreground. If you happen to be able to shoot towards the North Star, that'll be better, as you'll get rings around it. This shot is actually looking West, as there were more interesting features in the foreground, and the moon wasn't messing things up. Have your camera on a very sturdy tripod. If your tripod has a hook on the bottom, hang something heavy, like your camera bag, to steady it even more. Set your focus to Manual (otherwise your camera will search in the dark every-time you click). Experiment with the focus point, but for the most part I've found setting it right at the first infinity mark works great. Set your WB to Cloudy or Shade, or even Tungsten if you'd like a blue color-cast (or if you're shooting RAW, which I highly recommend, any WB besides Auto will work), again, for consistency so your cameras not changing its mind on each click. Go to Manual Mode. Set your Shutter Speed to 30-seconds. Use a wide-angle lens to get more sky in the frame, and set your Aperture at your largest f-Stop (f4 on this Canon 17-40mm), or if you're lens is like some, I've found it better to go 1-Stop down to f5.6 just to eliminate any chance of distortion. Take a test shot to verify your exposure on the histogram, and adjust your Aperture as needed. Plug in your remote cable release and your iPod, make sure you've got some hot fresh coffee (or whatever you fancy to drink) and get ready to shoot.
Now you've got two options, and I've tried them both. First, and this is how this one was shot - Take each shot manually, which will give you better results, but you'll have to pay more attention to what you're doing: Turn on your Mirror Lock-up, again, to eliminate as much vibrations as possible, then, with your cable release push once to lock-up the mirror, wait a fraction of a second, then push it again to start your exposure. At the end of the 30-sec, you'll hear the mirror pop back down, letting you know you're ready for your next exposure. You must repeat the 2-click cycle again to start the next exposure, without jostling the camera, and it must be done within 2 seconds, otherwise you'll have gaps in your trails. So, turn on your iPod, but not too loud so you don't miss the mirror sound, and click away. Second option, the easier/lazy man's (or women's) way to go - Semi-auto. Set your Shutter Drive Mode from single shot to multi-shot, you know, the rapid-fire as long as you're holding the shutter button mode. Now when you push your cable release, and lock it in place, at the end of each 30-sec exposure, it will automatically fire again, over and over and over - until you say stop. This works great if you want to hide in your nice, warm car, maybe get a bite to eat and come back in 30-45 minutes. The down side is the vibrations from your mirror slap on each exposure may show up as jagged lines in the trails. See - easier and lazier, but not the best results as the slow hand-made way, but it still works. I've thought about maybe laying a beanbag or something over my lens/body to see if that will dampen the mirror vibrations, but haven't gotten there yet.
Time to process all those images:
Use the black exposure layer for your bottom/background layer, then drag each of the other images on top of that layer, holding the Shift key as you drag and drop (which centers the images), then change the Blend Mode of each new layer to Screen (or sometimes Lighten works too), which will make the stars show up in each layer, while the dark areas remain the same. Depending on how many layers you've got versus how much memory your computer's got, you may need to flatten the layers every so often as the file will get very large, and your computer will seem to move as slow as those stars were that night. I just did a 45-min Venus trail, with 96 layers which came to 1.03Gb. Once it's done, flavor with a bit of Levels and Curves to taste, and you're ready to enjoy.
"If there is anything the nonconformist hates worse than a conformist, it's another nonconformist who doesn't conform to the prevailing standard of nonconformity"! Aknacer

"Just because you've bought a Canon (or -enter brand name here- ), doesn't make you a photographer - I just makes you a Canon owner. Unknown

Thursday, March 19, 2009

Eventually I'll also figure out how to add pages - And more important - Some of my photos to this blog, and I've got some great photos to share (so I've heard). Then, maybe the spiders will help someone find my little blog among the bazillion other blogs that are already out there.
One step at a time.
Well, here it is almost a month after I started looking into blogging, and I'm just now getting another chance to add to mine. I've read a lot of others though, in an attempt to get a feel for what one does with a blog.
I've been a bit tied up, and I'm also one that's never been accused of being organized. I've got many talents/skills and lots of knowledge in my head (including tons of useless stuff), with a great, sometimes dry, sense of humor - but the other side of being a classic ADD nut case, is the inability to function (i.e. organize/keep track of thoughts) as most normal folks do.
But I'm working on it, along with getting my research together to not only start writing many more articles on photography and Photoshop, but to add more classes to teach.

And Now, For Something Completely Different - 101 Photoshop Tips In 5 Min By Deke