Saturday, December 5, 2009

Auto-Focus - Gone Auto-Wrong?

Here’s a subject that I hear asked of me on a somewhat regular basis: How come what I wanted to be in focus is fuzzy while something else is in perfect focus?

The culprit is more than likely, your Auto-focus. It’s trying to think for you, but sometimes it over-thinks - Or, more likely, doesn’t know what you were thinking.


The camera’s default focus point is in the center, and if what you wanted to be in focus is not in the center too, things stop working as planned. Having your subject in focus is critical to making a great photo. To do that, you need to be in charge, don’t let that little guy (or gal) inside your camera make all the decisions for you.


Here’s a few tips to learn how to get better control of at least one of your so-called “Auto” functions.


1. We all know (at least you should know) that putting something in the middle of your composition is a bad thing. So here’s one work-around to the Auto-focus being in the center - This is how I always shot most of the time too:


Temporarily put your subject, that most important part that’s got to be in sharp focus, in the center of your viewfinder, then press your shutter button halfway and hold it. At that moment, that little guy/gal inside will focus on whatever is in the middle of the screen, choose a White Balance and set your Exposure depending on your camera settings and available light. Don’t let go of that button yet!


As long as you continue to hold the button down half-way, all of those settings will remain unchanged. Now, Recompose your scene by moving your camera slightly until the subject falls into place for your composition - Remembering the Rule-of-Thirds when possible.


Now, continue to push the shutter button all the way down to take the picture - And Bam, your photo’s in focus. Another advantage to this trick, especially on Point-n-Shoots, is that it speeds up “Shutter Delay” since all the pre-thinking that that little guy/gal inside has to do, has already been done. It’s just a matter of having him/her trip the shutter - Great for fast grandkids, puppies, cars or horses.


One problem that may appear, so watch for it, is, as your camera locks the exposure as well as focus, if the lighting is drastically different when you Recompose, your exposure may be off. Time to try methods two or three.


2. All DSLRs, and many Happy-Snappy/Point-and-Shoots, have a feature that allows you to manually select between the various focus points available on your camera. Most of the time it’s usually a button press, then rotating a dial on the back of the camera while looking through the viewfinder. You’ll see the various focus points highlight one at a time as you cycle thru your choices. Some cameras only have four focus points, while others can have 30 or more! You’ll have to break out your manual for specifics.


I’ll generally do this when my camera’s on a tripod, and what I want in focus is, or is going to be, in a different area than the center. Then it’s just a matter of hitting the button when ready.


Big reminder - Don’t forget, as I do on many occasions, to reset the focus point back to center when done!


And lastly #3. Now, I know some of you are getting lazy and forgetful with all this great new technology, while others have no idea what life was like before cameras had “auto-everything’ on them - Just the same, don't forget you also have an option to manually focus your lens.


Not many do, but even some point-and-shoot cameras have a manual focus setting too. I know it’s scary, but turn off your auto-focus, it's either a switch on the camera body (Nikon) or a switch on the lens (Canon), locate the manual focus ring on your lens (generally the slimmer ring) and just focus manually. I know it can be tough at times, I’m not real good at it myself, but with a little practice, it’s very easy and fast to do - it's also easier to achieve focus in low-light situations this way - As many Auto-focus systems don’t work in low-light.


Again - Make sure you're in control. Make the camera (and the little guy/gal inside) work for you. For better photos, don't let it (him or her) make all the decisions for you. Leave those moments for tacky touristy vacation photos and family picnics.


Thanks again for reading along,

Tony D. Locke, MM

Sunday, November 22, 2009

The Workshop That Became A Book

What started off as a series of Photography Workshops... Has now, thru the urging of the participants in both workshops, become a beautiful book.

The first workshop: "The Absence of Light" (There are two types of black; that of ink/paint/pigment, tires, asphalt, etc. and that which is in the darkest shadows where there is an "Absence of Light") was taught at Northern State Hospital using the outside of these historic, abandoned buildings with beautiful architecture, as a backdrop. The mission; use the shadows as either the focal point or an important element of your image.

Northern State Hospital, in Sedro Wolley, Washington, built from 1910-1912 was the State's Mental Asylum. If you needed this type of treatment, this facility was widely considered the best hospital of its kind at the time. It was also pretty close to being a self-sufficient working diary farm, which allowed some patients to be outside, working in the fields and with the animals. This hospitals main years of practice were in the early days of studying and treating mental health, with many procedures that today, including lobotomies, would be considered horrific. The facility was closed in the 70's, and has seen many years of aging and neglect due to lack of budget.

After shooting the outside of these buildings, many participants wanted the ability to go inside and shoot there too... Which turned into a 2nd workshop with the theme of "Emotion" (show us what emotion you were feeling, or would like us to feel in your image). There were many eerie feelings amongst all the photographers as we walked the halls of this famous hospital. Whether you believe in ghosts or not, there was no denying the sense of what life may have been like inside those walls.

From these two workshops, the photographers wanted some way to preserve and present what they captured, so the idea for a book was put forward, with proceeds from the sale going to a fund that has been made to assist in the renovation of these historic buildings.

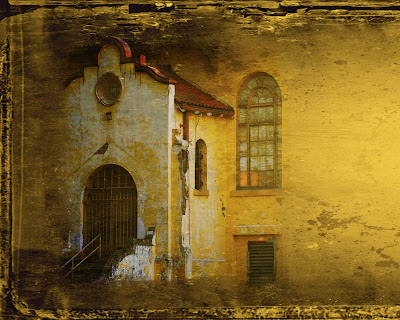
Below is the cover art that I made for the front and back of the book. There's a link on the side of this blog for ordering.

We are planning another set of workshops out there again this Spring. If you're interested in these or any other Photography Workshops taught by us, go to That Photo Shoppe to learn more.


Sunday, November 15, 2009

That Golden Hour - A Calculator For You

That fun little story on the right about "That Magic Hour" is something that all photographers live by, at least those like myself, that shoot outside.

Here's a link to two web-sites that will automatically calculate when That Magic Hour will be available for you, no matter where you are in the world - Allowing you to plan ahead, get up in time, eat breakfast (or dinner for me, as I'm not a morning person), have your kit ready, take a look at how the clouds are doing and go shot!

What makes it even better, should you be traveling - They will in most cases, figure out where you're at when you surf to it. More Auto-Magic stuff from the Internet.

Verify it did in fact find your location and click 'generate table' - Bam! Now you have another reason to grab someone to get out there and shoot!

Your Welcome,
Tony D. Locke, MM


`;{

Sunday, November 8, 2009

The Abstracts of Martian landscapes

I know, I know - I've gotten behind on my postings again! I'm trying, and have several written, it's just a matter of double-checking them and then getting them posted.

In the mean-time, I came across an amazing set of photographs that I wanted to share with you... Of Mars!

Saturday, October 17, 2009

More of Tony's Top Tips For Better Photos In Camera?

Many of you know, that as co-owner/founder of a digital photolab (That Photo Shoppe, Anacortes, WA - plug, plug) and a photography/Photoshop instructor, I spend a major portion of my days working (playing) in Photoshop, after all, it is my job. Probably about 60% of my time is spent in photo restoration, scanning, repairing and making new prints of old damaged family photos and slides. Another good chunk of time is spent performing fine-art printing & basic photo touch-up work, much like in the ‘ole dark room days, but now it’s all in my shiny new (Apple computer) digital dark room - all the same functions as before, and more, but now without the smelly mess to clean-up afterwards. And most important - I’ve got an “Undo Button” (and a history palette too), which reduces wasted film & a lot of time.

As we made That Photo Shoppe a comfortable, relaxing and inviting place for people to come in and chat, the remaining chunk of my day is spent talking with customers about what I do, what they do, and how they’d like to get better at this great little hobby.

Well, the underlying fact that I tell all of them is, even though I’ve become well known for my Photoshop skills and creativity, I’m still one that believes and practices as much as possible - Getting the image right in the camera first.

Now, that can go several ways. The two best examples of how I work are:

1: On most of my photos I’ll get my composition, shutter speed/aperture & exposure as accurate as possible while in the field (which as a landscape photographer means, I’m literally standing in a field). Then, all that remains for an image are the standard Levels & Curves adjustments, maybe a little Hue/Saturation and then a bit of Sharpening before printing. If an images needs to be cropped, I’ll do that first. Living in the Pacific Northwest, with skies that are either gray or overly bright, I may need some ND Graduation Filter types of adjustments on those skies too (I really do need to get an actual ND Grad Filter for use on my lens, but todays budgets say no).

2: I may have something odd in mind (as many of you have seen in my images), which cannot be accomplished within the camera, well, not within a single shot at least. Which means I’ve got to pre-visualize the different components of an image before I shoot them, having some type of idea of how they’ll all come together later in Photoshop - Which still means I’ve got to get each image right in camera first, so they’ll all work together in my digital darkroom. These “creations” can be anything from a panoramic, an HDR or one of my odd compositions. Take a look at my “Rusty Scissors”, which has become one of my best sellers, along with my other “Rusty” images as a simple example.

So, it’s back to the original idea for this article - Striving to get the very best possible in-camera image. I, like many others, would much rather spend more time hiking around outside, than sitting at my computer.

In this article, I’m going to share a few tips I use for better shooting. It doesn’t matter if you’re traveling out of the country or just across town.

My Top Tip for the best detail, and ability to apply more useful, non-destructive corrections is to shoot RAW and to use the lowest ISO possible for the lighting conditions. Now I know, not all of you can shoot RAW, or some of you may be scared of it. That’s fine, just make sure you follow all the rest of my tips, and when you’re capable/ready, get on the RAW wagon. Yes, there’s a bit more work involved in post-production, but it’s worth it when you see the quality of your images. As for ISO, keep it low to reduce noise, but if getting the shot requires boosting your ISO, then do it - A shot with a little bit of noise is better than no shot at all. And with todays newer sensors allowing even higher ISO’s with little to no noise, you’ve got a bit more leeway. Otherwise, when in doubt, leave it on Auto-ISO. Your camera will auto-keep-it on the lowest possible setting.

Think the opposite of the norm when it comes to lenses. The norm mostly being, telephoto lenses for distant wildlife and some portraits, while your wide-angle only comes out of the bag for those landscapes and street shoots. Do the opposite of what you think is the norm when you feel the urge to be more creative.

Shooting landscapes? Use your long telephoto to zoom in on distinct patterns in nature like tree lines or cliff & rock formations, giving them prominence over the vast landscape, while at the same time compressing the apparent distances between these points in your image. Use your wide-angle (or fish-eye for even more fun) on items that are very close in the foreground, such as environmental portraits (fancy words for: A subject in its environment), which can be anything from a lonely tree in a large meadow, or maybe it’s a horse, cow or lizard sitting on a rock instead. Get in close, follow your ‘rule-of-thirds’. To keep everything in the scene in focus, use a small aperture (f16 or smaller), and then set your focus about ⅓ the distance into the scene for amazingly great depth-of-field. You'll be amazed at what you'll find and see differently.

I know of one photographer, that, for a challenge will carry only his wide-angle zoom (17-40mm range), and a basic technique that pros have used for years. He’ll set his camera to Manual focus, Aperture priority and f22, then sets his focus point at 1 ft. for the wider angle shots, and 3 ft for the other end of the zoom, using the “focus distance scale” built in to the lens (if you’ve got one. Otherwise you guesstimate the distance). Putting his main subject close-in (while following the ‘Rule-of-Thirds”), he’s able to achieve amazing depth-of-field shots with very interesting (albeit sometimes proportionally distorted) images. The wide-angle also creates exaggerated distances between subjects in the image.

Here’s a 1/2 Tip - Keep this type of last idea in mind - Create a challenge for yourself. Leave the house with only one lens. Make it even harder; make it a non-zooming prime lens. If you don’t own one, set your zoom to one spot and don’t touch it. Say maybe 50mm, 85mm or 100mm - no zooming allowed! Doesn’t matter the length, just use it exclusively. See how you view the world differently now.

Pre-visualize your final cropping. Don’t be afraid to think about how you’ll crop an image, be it while you’re shooting or in post-production - Be creative, even think about the crop as part of your composition - Your Pre-Visualization. You don’t always have to use all the glass in your lens. Think of it, Remember it, Practice it.

Quite often, there are things that you’ll see in your viewfinder, that you know you can’t physically remove but also know you don’t want in your final image. They’re either distractions or don’t ‘work with the image’. One great composition rule is always: Remove what’s not important or doesn’t belong. If it’s not helping the image, it’s hurting it. One technique for solving this if it’s not possible in camera, is to crop it out. Or, I know many cringe at this, if needed, you can clone it out too.

When you get to post-processing, it’s always best to corp first, wether it’s in Camera RAW, or in Photoshop. Look at the image, find out what’s important, what’s distracting - Crop it out. Now, you can go with some of the more standard crop sizes, 8x10, 8x12, 5x7, etc., or, you can hit the “clear” button and free-hand a custom size/shape corp. Maybe even crop a vertical section out of a horizontal shot. Sometimes seeing an image on screen will trigger different feelings/ideas that can provide you with a completely different image. Don’t forget about square images either. There are whole groups of photographers that only crop square. It is a distinct look that I actually enjoy myself too. Get creative, break from the norm (but save the original just in case).

Another advantage of cropping before you do any other work (i.e. Levels, Curves, etc.) is that those adjustments (and your eyes) are not effected by the areas that don’t belong.


Pack your polarizer filter. Yeah, yeah I know. All of you that have only shot digital are of the mind-set; filters are only for those film folks. You, smitten with all your Photoshop filters, you’ll add any type of filter you please in post-processing. But… The one effect that can’t be duplicated 100% though, is a polarizing filter. No digital trickery can do the magic of reducing glare on water or letting you see through water to the rocks below, like a glass polarizing filter does. Though, there are some software which comes close to providing a convincing darkening of a blue sky and making white clouds look whiter, an “old fashioned” glass polarizer, adjusted properly, provides the best effect.

In order to get the best polarizer effect you must be properly positioned as the filter is only effective when the sun is to your left or right and, on todays cameras, it must be a “circular polarizer”.

Now, I’m not going to go into the hows/whys of how these filters do their tricks. It’s all a bunch of scientific mojo. Some kinda stuff about aligning or bending the waves of light rays. With polarizing filters limiting (filtering actually) which of these waves enter the camera. The frequencies that are allowed to pass are determined by it’s direction, the color of light, the size of the wave and it’s intensity - it’s all magic I tell you, so you’ll have to just trust me on this one, and give it a run.

While looking thru your viewfinder at the sky or the glare on water, or even the glistening water and reflections on some flowers & leaves, slowly rotate the polarizer filter and you’ll see the effect slowly increase, then decrease again as you rotate the filter around. You’ll see skies get darker, then lighter again, or if you’re at the lake, you’ll suddenly be able to see thru the water to the mud and rocks below. Gloss on shiny leaves will be reduced and colors will become more saturated.

The magic of photography, as it should be, with real glass not software. Some things will never change.

It’s in the eye. Very important tip when it comes to anyone or anything with eyes - If the eyes are not in sharp focus and properly lit, you’ll be sending that shot to the trash bin. While some use the focus lock on their camera to lock in the focus on the subject’s eyes before they shoot, others like myself will use the center focus point, then, while still holding the shutter half-way to lock that focus, recompose the subject in the frame before pushing the button the rest of the way. You can also often use a flash to brighten a subject’s face (fill flash), or to add some “catch lights” to the their eyes - Wether it’s a bug, crab on the beach or a clown face - make the eyes sharp over everything else and you’ll have a keeper.

Well, those are some of my top in-camera photo tips for today.


However, here is one more: Have fun! After all, you picked up a camera to have fun, right? Don’t get too caught up in all the technical aspects of picture-taking that you miss the fun.


Thanks again,

Tony

Think of it, Remember it, Practice it.

Thursday, September 17, 2009

Unclutter Your Screen Work Area

Hello again,

I was just working away on a few different photos for a couple customers, and I had them all up at the same time. Don't know why, but that's just how I work sometimes. My brain likes to take a break from one project and work on something different for a bit, then go back. Always bouncing around. And a lot of the time it's not even in Photoshop - Like right now! My brain has wondered off to write in my blog instead of working on photos. Hopefully it'll be back soon - I have no control over what pops into it!

When I've got several images up at once, I like to use one of my normal keyboard short-cuts (and for those who know me, know I live by keyboard short-cuts) to clean up my screen for better viewing of the image I'd like to concentrate on.

Well, the customer I was working with, in amazement, who (whom?) also is into Photoshop just had to ask - What did I just do with the stroke of a single key? So here I am to show you too.

This is another one of those stupid, why didn't I know about that, kind of shortcuts that, once you learn it you'll use it all the time.

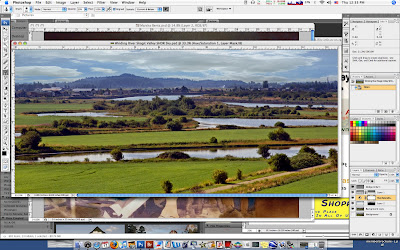
Here's one of my photos up on screen; notice all the clutter of other images and Bridge behind it?

It's hard to concentrate on what's important.

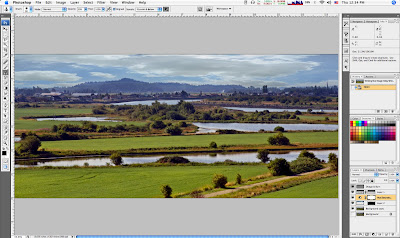
With simple push of the "F" key, it's all gone, and your image is full screen with a gray border around it and all your tools and palettes are still present.


Pretty nice, Huh?

Now, to get back to viewing your multiple windows, just push "Shift-F". Bam!

Now, the odd thing is that in your Photoshop drop-down menus, all (well, at least most of) the keyboard shortcuts for each function is shown to the side of that function in the drop-down menu. But this is one of those little secret ones that's not shown.

If you go to View>Screen Mode, you'll see the four options you have there - But no mention of a keyboard shortcut - Which is why I'm here to help you out.

By simply pushing the "F" Key, each push will toggle you thru each of the Screen Modes, while "Shift-F" will toggle you thru the modes in reverse order. Go ahead, give it a try, you know you want too!

See! Pretty slick, Huh?

And that's how I was able to quickly (and amazingly) clean-up my screen right in front of my customer.

Thanks again for coming by,
Tony D. Locke, MM


Sunday, September 13, 2009

Tony's Tips - Today Photoshop Keyboard Shortcuts

Need to Undo a White Balance in Camera RAW?

If you attempted to set the white balance in your image with the White Balance tool (I) , and you don't like what happened, you can undo your white balance setting (gotta love the ability to undo things) by double-clicking on the White Balance tool in Camera Raw. Simple huh?

Living On & Seeing The Layers Edge

Would you like to see where the edges of one of your layers lies (very handy for layers with soft edges) - Now would you? Well Bucko, just go up to the View menu > Show, and choose Layer Edges. Now a thin blue border will magically appear around the edges of your selected layer, allowing you to see and live on the edge of your layer's boundaries.


Would You Like to Move And/Or

Copy A Layer Mask?

Oh dude, this is so easy, you won't believe it. No fancy key combinations here. Just click directly on the layer mask's thumbnail and drag it to the layer where you want it. If you want a duplicate of a layer mask (instead of just moving it), press-and-hold the Option key (PC: Alt key) before you drag. Instant Mask copy - See, what'd I tell ya!


OK, enough for today. Hope you learned at least one trick/tip today. I don't have any idea why the paragraphs are formatting the way they are, that's just how Blogger works sometimes. I'm learning Wordpress too as another option, so keep track of me here, and you'll see the changes come along.


Thanks again for playing along and reading my blog,

Tony


Wednesday, August 19, 2009

Go Out And Take More Photos

Just like the 'ole saying goes: "Money doesn't grow on trees" - Well, by the same token... Photo's don't take themselves.


You can spend hours ogling over the photos on the internet, on the seemingly endless photo sites like Flickr (including mine of course, at www.flickr.com/photos/masterofmadness), not only admiring the work of others, but also trying to figure out how they're made.


But if you're going to take (or make actually) your own photos, you need to turn off the TV and computer, get up off your duff and either go outside, or to your work table and put in the practice time. This is a great hobby, which just like any other hobby, you learn by seeing what others have done, then go practice it yourself.


So while you're out there practicing, keep in mind these common mistakes and attitudes, all of which will make you a better photographer.


1. Set aside time and set out to take photos. Simply grab you bag and get out there! Set aside the time to actually enjoy it too. You don't have to spend more time than you actually have, as that'll just turn into an excuse for not going. Think about it as stealing time from other things that are less important, like watching TV, surfing the internet or laying around reading. Or, one of my favorites - The yard will still be there tomorrow, but that photo op won't.


2. Turn your cell phone off, or maybe... aaghh, don't even take it with you. OK, I know for some of you, it's almost a nagging habit, and you'll have withdrawals if you're without that pesky thing. So, if you must have it for emergencies, when it rings, just look at the caller ID and let it go to voicemail. There's no reason that you have to talk to them right this second - You're busy enjoying yourself right now and don't want to be interrupted!


3. Pack some food, snacks and a bottle of water or two. So now you won't be hunger or thirsty, which would otherwise provide yet, another easy excuse to go home. Grab snacks that are lightweight, have lots of energy and take no preparation time. Go get some of the 'better for you' energy bars. Cliff bars are great, as are the Luma and other brands that make energy bars specifically. Most are available now at your local grocery store too. In a pinch even the Kellogg or Quacker Oats types of 'cereal bars' would work too, maybe just not as healthy though. To make carrying the water around easier too, look into some of the various bottle holders and slings. This is again, an attempt to avoid any disincentives to carrying these around. Make it easy on yourself and you'll enjoy your time out shooting even more.


4. Dress appropriately. If you're not comfortable, you won't have fun and you'll want to come home - Remember, I'm trying to get you out to take photos, not go home.


There aren't too many things that will spoil the day like being too cold or too hot - Or too wet. Wear layers so that you can add/remove clothes as needed. Check weather reports for the area you'll be in. If it's going to cool, but otherwise nice, wear a few thin layers so you don't have to carry around a heavy coat once you've warmed up. If you going to be on a long trip, especially anything that includes the joy of hiking, you might consider bringing a complete change of clothes left in a separate bag to have ready in the car - Just in case you try to get a fish eye view from the water. You wouldn't want to get your car seats wet on the trip home.


Make sure to have good walking/hiking shoes or boots, and very important - good socks! You can have the best boots made, but if you've got thin, weak socks, your feet will make your life miserable all day, and sometimes into the next day too.


5. Pack only what you really need for this trip. After you've carried a heavy camera bag around for a few hours, you'll have wished you followed this step. There are several thoughts on this: One lens or multiple's.


If you're just going for a walk thru the woods, the park or candid street photography around town, you might not even pack your bag. Just grab your camera body and choose a lens. I usually like my trusty 'ole Canon 28-135 f3.5 IS for these trips. It takes great sharp photos, has stabilization, which generally means I don't need to lug around my tripod, and it has a nice zoom range which will cover most situations I may run into on a walk. Nikon and others also make something in a comparable range.


If you think you may run into some low-light situations, pack your flash and your tripod too. Actually, my tripod's always in the trunk, so if I need it, it's already with me. If you're thinking of exploring other areas, or maybe wanting to get a bit more serious or creative, then go ahead and pack what you think you'll need.


On my latest trip up Mt. Rainier, I carried three lens; 17-40 wide angle zoom, 28-135 medium zoom & 70-300 long zoom (oh yeah, and my fun little LensBaby, 'cause you never know when you might want something different). These packed easily, would cover most anything I ran into short of that Black Bear several hundred yards across the valley, saved weight and saved room for snacks and a light jacket. Make sure you've got a lens hood for each lens too.


If you're shooting with a 'Point-n-Shoot' or 'Happy-Snappy' type of camera, then you can ignore this step, as you've got one less reason to not get out and shoot now.


6. As an extension of the above step - Get over "Gear Envy" or "Camera Fetishes". Avoid the tendency to think "I've just got to have a new DSLR" or "Once I get that new lens I'll be ready to go out and shoot more". THE CAMERA DOESN'T MATTER (kinda).


I know I'm always lusting over the latest gear too, but due to budget issues (or lack of), they'll have to wait. Until then I'm still shooting and getting great shots with what I've got.


So, just get out there and shoot! Any camera will work, any lens will work. Even these new compact cellphone cameras will work too in the right conditions. Learn your camera, learn its limitations, adjust your photography to suit - And get out there and use it! As you grow with the hobby, go ahead and upgrade. At least you'll be better informed to make better decisions when you do, with less costly mistakes by buying the wrong gear. In the meantime, keep shooting.


Granted, yes, a better camera will technically take better pictures - But it's still the nut behind the wheel (meaning you) that's operating the camera, who'll make better photographs.


A little added note; When it comes to upgrades, you'll get your best bang for the buck with better glass/lens, which you'll always be able use later. New bodies are nice too, but you'll never stay caught up. As soon as you buy a new body, it'll be replaced with something faster, better, shinier. While your lens will always be ready to go.


7. Now that you're back from shooting - Turn your computer back on, download your images and see how you've done. The fastest way to get better at photography is to immediately throw away the bad photos!


Don't even consider saving them for later. If it's bad now, it'll be bad later too. But... Learn from them. What's wrong with them, what did you do wrong that you can do better later? Sort, name and tag the others. Then, grab the best of the best for working with - Which will be another blog entry.


While your sitting there staring at your screen, first, make sure all our batteries are on their chargers, ready to for your next photo trip. Then, go ahead and do some more research at photo websites. Google the type of photos you just took, i.e. "How to take better landscape photos", "How to improve macro shots", "How to make kids & pets pay attention".


You'll gain artistic and technical lessons, which you'll be able to use the next time you "Go Out And Take More Photos"


Thanks again for playing along and reading my blog.


Tony


P.S. Let me know how I'm doing with this blog thing. It's still all new to me. This is just as much a learning experience for me as being a photographer is. I'm going to try to be more consistent with my entries.

Are you learning anything? Does any of this make sense? Is there something you'd like covered? Is there something I can do to improve my blog, my writing, my types of articles? Or... Have you just wasted another 10-15 minutes on the computer? Be honest, let me know. Thanks again, Tony


Tuesday, August 4, 2009

100 Strangers In One Year (or so)

As part of a personal challenge, I've started a new project - 100 Strangers. I'm more of a landscape and abstract/macro/fine art photographer, I don't do portraits, and definitely don't do weddings. I've played with street photography, but have always been shy when it comes to shooting people - Thus this challenge: Meet and photograph 100 Strangers in the next year (or so).

I've only started about a week or so ago, and have 3 Strangers on my Flickr site so far, but I've got others lined up and plan on getting more as I can. It's not been easy, and I have been turned down, but that's part of the challenge.

I encourage all of you to find a project that gets you out of your comfort zone and out shooting more. For some people I know, who are more comfortable shooting nature and wildlife, shooting landscapes is difficult, while those who (whom?) shoot weddings, can't figure out how to shoot anything else except people. Find a weakness that also interests you, turn it into a project, and go for it. Having a project is almost like having a goal that needs to be met... But in a fun way.

Here's the description of the basics, taken from their site www.100strangers.com

100 Strangers

Step out of your comfort zone to a new level of portrait photography: take 100 portraits of people you don't know.

The idea

The One Hundred Strangers project is a learning group for people who want to improve the social and technical skills needed for taking portraits of strangers and telling their stories. The method is learning by doing.

The project is lots of fun and improves photojournalistic skills. During the process you might expand your every day living experience - and who knows, maybe you will even get a couple of new friends during the process.

We welcome both beginner and advanced photographers. You may be new to photographing strangers or already have experience of this type of photography.

The challenge

Take 100 photographs of at least 100 people you don't know. Approach a person or group of people and ask for permission to both take a photo of them and to post it to the flickr 100 Strangers group. Get to know your subjects. Who are they? What is their life like?

Try to tell a small story with each photo you take. This may be a story about the person or how you felt approaching that particular individual. You may have, for example, tried a new approach or used a new photographic technique. Try to learn something from every encounter you make.

This site

The project can be seen at the 100 strangers group in flickr. This site is to showcase the project outside the flickr framework.


Photo Word Search Fun

Hello,
It's been awhile since I've posted anything here... Sorry. It's been a crazy month. The last post talks about our new store - well, while unpacking and moving into this new store, we were, at the same time, packing and moving our house too. We weren't planing on moving both in the same month, that's just how the stars lined up for us I guess. We knew we would probably be moving our house around then, but the store was just something that came up.

I've got some new lessons in the works, which I hope to have up in the next day or so, but in the mean time, I've come up with a little word search puzzle for you to play. I've made the difficulty 'Medium', which means the words go up, down, left & right. Didn't want to make it too easy (or hard) on you.
Enjoy.


Tuesday, June 30, 2009

It's Official - We've Moved Our Store!!

Just a quick note to all of those that follow us at That Photo Shoppe, and to all that will -

After over 3 1/2 years at our original location - We've moved about a block and half down the street to 1005 7th St.

We're just behind Donatella's Flowers and next door to the Elks Lodge, just a 1/2 block off of Commercial. We just finished painting inside and out this weekend, and are still working on a new sign, as budget allows. The outside is now a very bright "raspberry pink" with yellow trim - Hard to miss us.

Website is still thatphotoshoppe.com and the phone is still 360.588.6968.

We're in the works to add cameras and camera accessories to our store real soon, while still doing all the great digital photolab services (archival printing, scanning, photo restoration, classes, etc.) that we've become known for.

Come on in to see all that's new and say hi! We're looking forward to seeing you.

Thanks,
Tony D. Locke, MM

Wednesday, May 20, 2009

Add A Dash Of Grain For Taste

Bizarre, isn't it? We've all tried, since the dawn of film, to avoid or eradicate grain in our images, and now that it's gone - We want it back!

Call it nostalgia, but for atmospheric low-key shots
or gritty reportage (thanks to the look of high-speed film), grain has become part of our visual language. The problem is, that with digital sensor noise, it's just not the same. So how does one recreate in convincingly? Well, though it's not exactly the same, here's one of many techniques that will get you very close.

Photoshops Film Grain filter can be useful, but its results aren't quite what you'd expect. The 'grain' edges are a bit too sharp. Anyone that's spent any time with 'old high-speed film' knows that the grain has a slight softness to it, which is what creates part of the character we've been accustomed to. So here's how to emulate that "old emulsion" (is there a pun in there?).

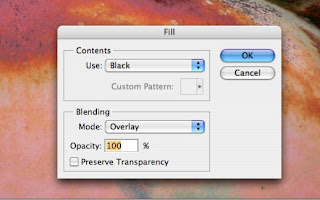
Open your image, black & white's work best, but any image you'd like to age will work. Do your normal adjustment layers first (Levels, Hue/Sat, Curves, etc.), then, above the image layer create a new blank layer, Layer>New, or the click on the little 'post-it note' looking icon in the Layers pallette. Fill this layer, Edit>Fill... with either Black or White, it doesn't really matter for us today.


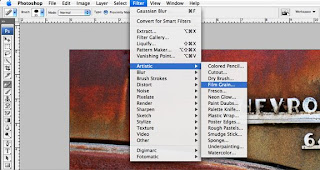
Select Filter>Artistic>Film Grain... And set the Grain Value to its maximum. At that setting
the other two sliders don't make a whole of difference, so fiddle if you like, but otherwise hit OK. Now, change that layers blend mode to 'Overlay", which will superimpose your new found grain on the image.


But wait, it's still not quite right for our taste, it needs a bit of softening.

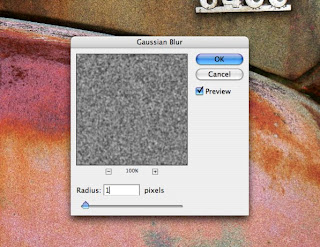
Go to Filter>Blur>Gaussian Blur and set this to 1-pixel and hit OK.


Now it's just a matter of lowering the opacity of that layer to taste (don't forget to rename that layer so you'll remember what it's purpose in life is), or duplicating that layer to add more grain. Again, season for taste.

That's it for today,
Thanks again for stopping by,
Tony

People Thoughts

Hello, just throwing in a few quotes/ideas I've run across, that I thought were fun and descriptive of life, including mine, while I'm working up my next blog post.

"There are two types of people in this world; Those that divide people into types and those who don't" unknown.

"There are some people that live in a dream world, and there are some who face reality - And then there are those who turn one into the other" Douglas Everett

"A photograph is not taken - it is made" Ansel Adams

Thursday, April 30, 2009

Dodge & Burn Like An Expert, With More Control

Black & White images can always use a bit of help with a little Dodging (to lighten) & Burning (to darken) in specific areas to improve the contrast and add extra impact. This secret weapon of master printers is no different today, than it was in the good ole' darkroom film days. Except now, it's easier, cleaner, there's no smelly mess and we also get an 'undo' button. Learn more right now.

The Dodge & Burn tools in Photoshop & Elements are OK, but they're not great, and they don't offer as much control as you'd probably like. So here's a way to have a simplier and more effective set of Dodge & Burn tools, with keyboard short-cuts that will have you zipping right along to creating your masterpiece.

1. Create a new Grey Layer. Layer>New>Layer. In the next window, choose Soft Light from the Mode drop-down and check the box 'Fill with Soft-Light-Neutral color (50% grey).

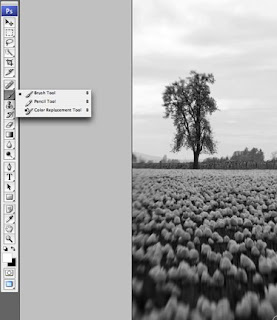
2. Select the Grey Layer and choose the Brush tool. Set the brush size as needed either at the Brush tools drop down menu or with the bracket keys ( [ & ] ), and choose an appropriate softness. Set the Brush opacity to 20% to start with. Press the 'D key' to set the paint swatches to their default colors of Black & White.

3. Start Dodging & Burning with your Brush. Set the Color Swatch to Black to Darken/Burn areas of your image & White to Lighten/Dodge other areas. Raise or Lower the Brush opacity for a stronger or weaker effect - Use Keyboard short-cuts to move faster: Press the 1 - 0 keys for a quick change of Brush opacity from 10% - 100% (example: pressing 5 = 50%, 3 = 30%). Pressing the X key will toggle the Black & White swatches for even quicker Dodging & Burning tool selection.

4. Bonus Option. For those of you using Photoshop CS or above, you can make an Action for the above technique, then assign that action to one of your Function F keys. Now, anytime you'd like to Dodge & Burn an image, simply press the 'F' key that you've assigned and Photoshop will automatically make the Dodge & Burn layer, choose the default Black & White swatch colors and select a 20% brush. Don't understand how to make an Action or have other things you'd like to learn? Email me or leave a comment.

Thanks again for reading,
Tony

Friday, April 17, 2009

Get Close, Get Happy


Have Fun! - Get Close!

By Tony D. Locke, MM


Looking for something new and challenging, now that the weather has turned somewhat better, on some days at least? Try your hand at close-up Macro photography. Anythings fair game, from the obvious flowers & bugs, to any odd household item in the junk drawer or garage. Just like the image above, which is a little metal 'knick-knack' box, about 3-inches square, with little beads weaved inside. Zoom in close and get to see the details you'd otherwise miss.


No special equipment is needed, and any camera can do it. You’ll be surprised how close you can get with everyday lenses. Granted, a DSLR with a specialty ‘macro lens’ and associated equipment will get you in closer and sharper, but give it a try with your existing equipment first, to see if you even like this type of photography before spending your hard earned money on new toys - As you continue to pursue each of the different aspects of this great hobby, you’ll find plenty of ways to spend your money, just ask anyone that’s been at it for awhile!


You can experiment with any focal length - Wide, ‘normal’, telephoto or even the lens included on your Point-n-Shoot. Each lens allows its own unique perspective on close-up photography. So, how close can you get? Most lens will have a “minimum focus distance” etched into the side of the barrel. While with Point-n-shoots, this spec will be listed in your owners manual. Try to get any closer and your lens will not be able to focus properly.


From there, it’s just a matter of experimenting, moving in and out to see how each lens works and what type of shots you can get. Extension tubes are an inexpensive accessory to look into. They’re simply hollow ‘tubes’ installed between your lens and the camera body, which reduce the minimum focus distances by moving the lens further away from the sensor, and allowing you to get even closer. Though you do lose a little light, so shutter speeds will be longer, so you may or may not be able to hand-hold.


Careful though - At these close distances, any slight movement on your part, or the slightest breeze on a flower (or scurrying bug), adds to the challenge of obtaining a sharp focus. Depths of field will also be measured in fractions of an inch, so a tripod becomes a very useful and highly recommended tool. Telephoto lens are handy for insects, as they’ll allow you to keep a safe distance - Not only so you don’t spook them and make them fly off, but so they don’t jump up and bite!


Lighting can include anything from a desk lamp, to flashlights or dedicated macro-flash. Camera flash doesn’t work very well though, as it’s going to shoot over the top of what your focusing on. Also, beware of shadows, including yourself and your camera.


Have fun, experiment, read, and go out and experiment some more. Have questions, email me, follow this blog, or go to my thatphotoshoppe.com website for more info.

Sunday, April 12, 2009

Cowboy Up Your Rodeo Shooting

Spring is almost upon us (at least in the Northern parts of the world), and with that comes the time to get out and start practicing your favorite sports to stay in shape and have fun - And your sports photography too. I'm one of those types that was never good at sports growing up, don't know why, I just wasn't meant to be, no matter how hard I tried. I can hold my own in Beach Volleyball & bike riding, but otherwise I suck. Oh well, I got over it long ago by being a lot smarter than the 'jocks'. I do enjoy watching others that are good at it though, and plan on working at taking more photos of them doing it too.

Now rodeo - That's just as much a sport as it is a rush for thrill seekers. Growing up as a "long-hair-hippie-rock-musician" during the 70's (and yes, enjoying everything "the 70's" was known for), rodeo was not something you'd find me doing. But, if the rest of my long-hair friends weren't paying attention, I'd sneak off and watch one once in awhile, if for nothing else than the spectacle of "...what the @#$% are these cowboys trying to do"?!! I don't pretend to understand how they do what they do, but I can understand - and respect, the skill and guts it takes to get on top of a pissed-off bull and go for a ride.

Unfortunately I wasn't a photographer then (just a long-hair rock musician that was smart & sucked at sports), but I am today.

So, here's a few tips I've compiled on how to get some great shots of those crazy cowboys as they enjoy their thrill seeking sport.

1. Use your ISO to its best benefit - Faster shutter speeds in low light. This is not a slow sport! Set you camera to Shutter Priority. If you're lucky enough to be outside in the daytime, instead of an inside arena, you may have enough sun light to get by with lower ISO's, but if not, bump it up to keep your shutter speed in the range you need to stop-action the events happening in front of you. You'll also, more than likely, be hand-holding your camera with a long lens too, so fast shutter speeds are important. At ISO 400 you should be able to keep the noise down and get 1/1000 sec at f8 or so on most sunny days, jump to ISO 800 and you'll gain another stop or two of shutter speed, and/or bump to f11 for a bit more depth of field. Though on most rodeo action you're more concerned about freezing action than what's at the other side of the dirt. But, on the other hand, that added depth of field could help if your auto-focus locked on the bull's nose, instead of the rider's. At least hopefully they'll both be in focus now. Experiment with how your camera's ISO range affects noise. Some are better than others of course, but a bit of noise is generally preferred over a missed action shot. And, that extra noise can add a bit more grit to the grit of cowboys.

2. Go Long - That is with your lens of course. You're going to want something in the 300mm f4 range for the most part, as most arenas are at least 50-60 yards or more across. A good zoom in the 70-300 range should do fine, especially when the action moves close to you, you'll appreciate the ability to zoom back too - Just be careful if the action suddenly appears as if it's going to land in your lap (since you are looking at it thru a telephoto), and you jump back into something, or someone you probably don't want to meet by accident. Which brings up another important rule for rodeo - Watch were you walk! Do the terms 'road apple', 'cow patty' or any of the other many names for fresh 'animal droppings' come to mind?

3. Start small & local. Your local small town rodeo is a much easier place to start learning how to shoot, than one of the big county or state championships. It'll probably be daytime, and you'll generally have no problem getting right on the fence - That much closer to the action, smell and dirt of this exciting sport. Again, pay attention to your surroundings, those are some damn big animals. Which, for the most part, are mad because either some fool is sitting on them or has jumped off their horse and is trying to wrestle them to the ground. These animals are moving as fast as they can to try and eject that cowboy (or girl), and/or get away so now they can chase the cowboy and stomp on 'em. Which is when the rodeo clowns come out - More opportunities for some great actions shots. All part of the sport - Hey, the animals what some fun too!

4. Auto auto-focus. Set your camera to 'servo', 'continuous focus' mode, or whatever your camera calls it, if you can. This mode will continue to track the action and constantly adjust your auto-focus as you're holding your shutter button, up to the point you push to trip the shutter. Remember, focus on the eyes, mostly of the rider, but the horse they're on or the animal they're wrestling with can provide some great expressions too. With a bit of practice, you'll be able to 'focus and recompose' too, framing the action for better compositions.

5. Keep clean. Not just clean shots, but clean equipment too. Make sure you have a lens hood attached. This will not only reduce the possibility of flare, but it will help in the protection of your lens glass from the impact of flying dirt chunks. Besides, it makes you look more professional and legitimate, so people will allow you more space for shooting (or bug you with a million questions about your gear). A UV filter is recommended too for that same cleanness and safety. Keep a small lens brush in one of your pockets, handy for those times you need to wipe off the dirt clods that made it in. One of those that look like a retractable pen are great. A lens cloth may scratch if the clods are fine or sharp, but you'll want one handy just the same. Another rag to wipe yourself off now and then will come in handy too, this is a dirty sport - Just make sure you don't mix it up with the lens cloth when you go to wipe off your glass!

6. Have Fun! Enjoy the spectacle, the food, drinks and the crowd - Which are always good for a few great candid shots too. Very Important - Don't try to touch (or hop on) any of the animals without asking for permission and instruction first. And, no matter how cool they look, don't buy a cowboy hat & boots unless you can really pull off the look and attitude that goes with it. It'll just make you look silly and piss off the real cowboys! And, I'm sure if they could, the rodeo animals would enjoy a laugh too if the saw you walking by.

Enjoy, Thanks for reading along,
Tony

Tuesday, April 7, 2009

Hello!
Great News - I just had my first sale of an image from one of my web-sites. This "Rusty Scissors" image was just sold for use on the cover of a new book being published in Greece, in Greek, called "O Raftis tou Poseidona" (The Tailor of Neptune). Along with the "use" price, I'll receive credit on the inside back flap and two copies of the book.
I've had several of my images sold in my store, both framed & unframed and on ceramic tiles as 'fine-art' and chosen for corporate art (prize trophy & sponsor thank you plaque's for golf tournaments, etc.), but this is first from my Flickr site.

Thursday, March 26, 2009

Updates & Extra Credit For Magic Squares

Hello again. I've heard from several readers, that the "Magic Squares" project was 'interesting, but too much to figure out' - Sorry about that. I wanted to present a fun challenging way to create a unique version of one of your images. If that one was difficult due to the number of squares, try again, but this time only make four squares. It will still look great, and be much easier to build. I'll make the next one a bit easier - maybe.

Now, for some extra credit to those of you who (whom?) enjoyed the last project, here's how to make it more unique. First, if you didn't like how the Stroke along the outside turned out after setting all the layers, go back to any one of them, double click on the fx icon on the layer, make your changes, then do the 'Copy layer style/Paster layer style' technique again to each of the layers.

Next, lets rearrange the order of the layers to control/change the overlap of each of the squares. Remember, the squares/layers are stacked, from top to bottom. Any layer that's on top, will go over the square/layer below it. You can rearrange to your hearts delight to create overlaps as desired. This allows you to have some squares under one or two of its neighbors, but overlap one or more of the others. Look across the bottom of my image for examples.

This can be done wether you've got 20 layers or 2. The final look is up to you.

That's today's post. Email any questions/ideas/comments.
Thanks for playing.

Sunday, March 22, 2009

That Magic Squares Trick


Isn't that just the niftiest thing you've ever seen? I made it myself, and I'm about to tell you how so you can do it too.

This is another in my series of Photoshop & Photography tricks that I'm going to add to my blogs. This is mostly for CS2 and above, but it may be doable in Elements with a few work arounds. This is an image that I took some time ago, then played with in CS3 to make it look like a kinda mosaic or bunch of small photos laid on the table, puzzle fashion, to make the larger image appear. There are several ways of doing this, which are similar to the "out of box" look that many, including myself, like to play with, but just handled slight different. I'll describe that "out of box" trick in another post.

I'm not sure if I'll be able to completely describe how I did this image, so that it makes sense to anyone but me, but I'll give it a try. If anything, you'll at least have a good time reading this, and a starting point to experiment - Which is what this fun craft of Photography and Photoshop is all about, ain't it?

Alrighty now, on with the lesson. Before we begin - Remember back in Grade School, how you were taught to always duplicate your image first, and rename it so that if you totally bugger this image up, you'll have that original safe image, still sitting there with a smiley little grin. Do it now! Don't worry, we won't watch. I know, I know, some of you will probably ignore this sane bit of advice, thinking you know better - But you're probably the same kids that were told that it's really not a good idea to shove those Monopoly pieces up your nose, but you did it anyway. You were wrong then too, so again, just do as your told!

Essentially, you draw each of the squares by making a selection with your Marquee Tool, right over the top of the image. It may help to pre-draw the location, angle and number of squares on a piece of paper first, so you'll have an idea of how they'll layout. Put each piece of the main image that you've selected on it's own layer - Layer>New>Layer via copy, or Comm-J/Ctrl-J. As you're drawing each of the squares, hold the Shift key to produce a perfect square and have your Info Window open (View>Info) so you can verify the sizes match as you're dragging your mouse. That is of course, if you would like all your squares to be the same size. I dunno, you're the artist here, maybe mixing up the shapes looks cool too. I've got other images where I've done just that, with varying levels of success, or not - Experiment is the word of the day.

After you've got all the sections selected and placed on their own layers, select the background layer and turn off its Visibility Eye (the little eye icon to the left of the layer), which is like hiding it. Sha-zamm! You've now got the beginnings to this magic looking piece of art. If needed, go back and tweak, and/or redo any selections that don't quite look right by repeating the above paragraph.

Now, with the background layer still selected, click on the Adjustment Layer button (you know, that Ying-Yang looking circle) and chose Solid Color (or Pattern, or Gradient - Again, you're the artist here - But for now, solid color's easier to explain). Since you had the background layer selected first, this new layer will appear above it, but below all your pretty squares. In the next window, chose a color you like and hit OK, this will become your new background below all the squares. On mine, I also added a Pattern Layer above the color to add some texture, so just repeat the last sentence and play with the Opacity of that layer as needed. I've also added an additional canvas extension, with a complementary color to mine too, which if you're so inclined, you can do too. It's under Image>Canvas Size. Turn off the "Relative" box, type in the size of extra Canvas you'd like and hit OK. Remember, it's going to be spread across both sides, so if you'd like 1 1/2" added to each side of your image, type in "3" on the height and width.

Looking good now, aren't we? Well, hold on Bucko, you've still got a bit more work to do before heading over to that blender filled with enough tequila and ice to stun an elephant.

Select one of the square's layers, then click on the Layer Style button, which is the small fx button at the bottom of the Layers pallet, and chose Stroke (in Elements, you'll have to dig around to find the Style features, as it's slightly different in each version, and it's been awhile since I've done this in Elements). Now you get to chose a Stroke color (the line around the outside of each square) and thickness. On the pop-down, chose Inside. I've stayed with White here, and increased the width to something that looked pleasing. OK, while you still have the Layer Styles window open, chose Drop Shadow, making sure Global Light is checked (this insures that all shadows will go the same direction, which is after all, how nature intended it), add a bit of drop shadow to your square - Now remember, like any other seasoning, you add enough for good taste, but not so much that others could get sick. Go ahead and do these steps with your image now... We'll wait. When you're done, hit OK. Next, you get to Ctrl-Click on that layer (Or Right-Click for those of you on PC's that rhyme with Blindoes) and choose "Copy Layer Style", then go to each of the other layers, Ctrl/Right-Click and chose "Paster Layer Style", which, if you've properly followed along so far, should produce a pretty border and shadow to all your neat little puzzle squares, exactly like the first one you made.

How's it look? Isn't this a fun and pretty thing you've made now? I bet you're so excited you can't wait to chose another image to try it again. But first - You need to print this one out and hang it on the fridge with one of those lovely magnets you picked up in Las Vegas, just to make a mother proud.

Well, that's the jest of it. It's not one of the easiest or quickest Photoshop tricks, but fun. So, you may need to tweak, adjust, say a few 'choice words' to your screen if things aren't going as you'd like, experiment some more, go get a drink of something strong (like that blender full of tequila and ice that you told me about earlier), come back, maybe read your emails or some humorous web-sites, then get back on that Photoshop horse and try again until you get something you like.

My next step for this image, since we also print photos onto ceramic tiles at That Photo Shoppe, is to print each of these squares onto individual 4" square tiles, and mount them as they're laid out here, to a colored background, with maybe a watercolor paper or fabric below them - That's the next experiment. If it works, I'll post a picture of it here. If not, I'll punt, then join you for that drink.

Thanks for reading along, let me know if you have any questions/suggestions for future posts,
Tony

Friday, March 20, 2009

It Workie

Hey Look at me! I've figured out how to insert photos! Now the next step is if I can figure out the formatting of the image and text so that they fit together on the page

Buddha Dudes Chatt'n

This is a combination of two of my hobbies/trades - Bonsai and photography.
These are 'mud-men' that are used as decorative accessories around bonsai trees. I've had up to around 35 trees at one time, but generally lose at least one or two each winter, despite trying to keep them protected, then I'll add a new one or two the next spring, just to lose another one again. It's a fun, but slow and sometimes frustrating hobby.
I've got these types of "Buddha Dudes", as I've always called them, on several of my plants around the yard. This is a close-up Macro shot of them discussing the worlds issues, while having a little something-something to smoke. They're actually only about 1 1/2 inches tall.

30 Minute Star Trails "How To"

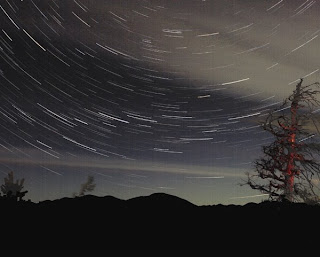
A 30-minute star trail, shot from Sun Mountain in the Cascade Mountains, at about 4,000ft, with snow, 20 degrees and wind blowing up my jacket.
But it came out very nice. It's actually 60 - 30 second shots combined as layers in CS3. This technique reduces the noise that's normal with a long exposure. While shooting, you add one 'black' shot at the end too (I just hold my hat over the front of the lens), which also helps in the noise reduction later in Photoshop.

Make sure you have a good flashlight (or torch for our friends across the pond), and make sure you have a fresh battery in it and your camera. A 1/2 hours worth of shooting every 30-sec will drain it dry. Find an area with an interesting foreground. If you happen to be able to shoot towards the North Star, that'll be better, as you'll get rings around it. This shot is actually looking West, as there were more interesting features in the foreground, and the moon wasn't messing things up. Have your camera on a very sturdy tripod. If your tripod has a hook on the bottom, hang something heavy, like your camera bag, to steady it even more. Set your focus to Manual (otherwise your camera will search in the dark every-time you click). Experiment with the focus point, but for the most part I've found setting it right at the first infinity mark works great. Set your WB to Cloudy or Shade, or even Tungsten if you'd like a blue color-cast (or if you're shooting RAW, which I highly recommend, any WB besides Auto will work), again, for consistency so your cameras not changing its mind on each click. Go to Manual Mode. Set your Shutter Speed to 30-seconds. Use a wide-angle lens to get more sky in the frame, and set your Aperture at your largest f-Stop (f4 on this Canon 17-40mm), or if you're lens is like some, I've found it better to go 1-Stop down to f5.6 just to eliminate any chance of distortion. Take a test shot to verify your exposure on the histogram, and adjust your Aperture as needed. Plug in your remote cable release and your iPod, make sure you've got some hot fresh coffee (or whatever you fancy to drink) and get ready to shoot.
Now you've got two options, and I've tried them both. First, and this is how this one was shot - Take each shot manually, which will give you better results, but you'll have to pay more attention to what you're doing: Turn on your Mirror Lock-up, again, to eliminate as much vibrations as possible, then, with your cable release push once to lock-up the mirror, wait a fraction of a second, then push it again to start your exposure. At the end of the 30-sec, you'll hear the mirror pop back down, letting you know you're ready for your next exposure. You must repeat the 2-click cycle again to start the next exposure, without jostling the camera, and it must be done within 2 seconds, otherwise you'll have gaps in your trails. So, turn on your iPod, but not too loud so you don't miss the mirror sound, and click away. Second option, the easier/lazy man's (or women's) way to go - Semi-auto. Set your Shutter Drive Mode from single shot to multi-shot, you know, the rapid-fire as long as you're holding the shutter button mode. Now when you push your cable release, and lock it in place, at the end of each 30-sec exposure, it will automatically fire again, over and over and over - until you say stop. This works great if you want to hide in your nice, warm car, maybe get a bite to eat and come back in 30-45 minutes. The down side is the vibrations from your mirror slap on each exposure may show up as jagged lines in the trails. See - easier and lazier, but not the best results as the slow hand-made way, but it still works. I've thought about maybe laying a beanbag or something over my lens/body to see if that will dampen the mirror vibrations, but haven't gotten there yet.
Time to process all those images:
Use the black exposure layer for your bottom/background layer, then drag each of the other images on top of that layer, holding the Shift key as you drag and drop (which centers the images), then change the Blend Mode of each new layer to Screen (or sometimes Lighten works too), which will make the stars show up in each layer, while the dark areas remain the same. Depending on how many layers you've got versus how much memory your computer's got, you may need to flatten the layers every so often as the file will get very large, and your computer will seem to move as slow as those stars were that night. I just did a 45-min Venus trail, with 96 layers which came to 1.03Gb. Once it's done, flavor with a bit of Levels and Curves to taste, and you're ready to enjoy.

And Now, For Something Completely Different - 101 Photoshop Tips In 5 Min By Deke