Tuesday, June 30, 2009

It's Official - We've Moved Our Store!!

Just a quick note to all of those that follow us at That Photo Shoppe, and to all that will -

After over 3 1/2 years at our original location - We've moved about a block and half down the street to 1005 7th St.

We're just behind Donatella's Flowers and next door to the Elks Lodge, just a 1/2 block off of Commercial. We just finished painting inside and out this weekend, and are still working on a new sign, as budget allows. The outside is now a very bright "raspberry pink" with yellow trim - Hard to miss us.

Website is still thatphotoshoppe.com and the phone is still 360.588.6968.

We're in the works to add cameras and camera accessories to our store real soon, while still doing all the great digital photolab services (archival printing, scanning, photo restoration, classes, etc.) that we've become known for.

Come on in to see all that's new and say hi! We're looking forward to seeing you.

Thanks,
Tony D. Locke, MM

Wednesday, May 20, 2009

Add A Dash Of Grain For Taste

Bizarre, isn't it? We've all tried, since the dawn of film, to avoid or eradicate grain in our images, and now that it's gone - We want it back!

Call it nostalgia, but for atmospheric low-key shots
or gritty reportage (thanks to the look of high-speed film), grain has become part of our visual language. The problem is, that with digital sensor noise, it's just not the same. So how does one recreate in convincingly? Well, though it's not exactly the same, here's one of many techniques that will get you very close.

Photoshops Film Grain filter can be useful, but its results aren't quite what you'd expect. The 'grain' edges are a bit too sharp. Anyone that's spent any time with 'old high-speed film' knows that the grain has a slight softness to it, which is what creates part of the character we've been accustomed to. So here's how to emulate that "old emulsion" (is there a pun in there?).

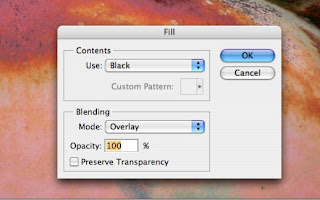
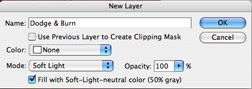
Open your image, black & white's work best, but any image you'd like to age will work. Do your normal adjustment layers first (Levels, Hue/Sat, Curves, etc.), then, above the image layer create a new blank layer, Layer>New, or the click on the little 'post-it note' looking icon in the Layers pallette. Fill this layer, Edit>Fill... with either Black or White, it doesn't really matter for us today.


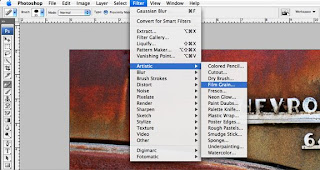
Select Filter>Artistic>Film Grain... And set the Grain Value to its maximum. At that setting
the other two sliders don't make a whole of difference, so fiddle if you like, but otherwise hit OK. Now, change that layers blend mode to 'Overlay", which will superimpose your new found grain on the image.


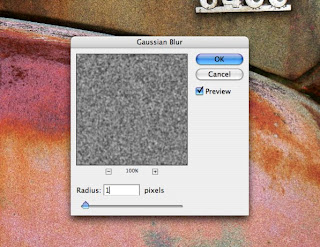
But wait, it's still not quite right for our taste, it needs a bit of softening.

Go to Filter>Blur>Gaussian Blur and set this to 1-pixel and hit OK.


Now it's just a matter of lowering the opacity of that layer to taste (don't forget to rename that layer so you'll remember what it's purpose in life is), or duplicating that layer to add more grain. Again, season for taste.

That's it for today,
Thanks again for stopping by,
Tony

People Thoughts

Hello, just throwing in a few quotes/ideas I've run across, that I thought were fun and descriptive of life, including mine, while I'm working up my next blog post.

"There are two types of people in this world; Those that divide people into types and those who don't" unknown.

"There are some people that live in a dream world, and there are some who face reality - And then there are those who turn one into the other" Douglas Everett

"A photograph is not taken - it is made" Ansel Adams

Thursday, April 30, 2009

Dodge & Burn Like An Expert, With More Control

Black & White images can always use a bit of help with a little Dodging (to lighten) & Burning (to darken) in specific areas to improve the contrast and add extra impact. This secret weapon of master printers is no different today, than it was in the good ole' darkroom film days. Except now, it's easier, cleaner, there's no smelly mess and we also get an 'undo' button. Learn more right now.

The Dodge & Burn tools in Photoshop & Elements are OK, but they're not great, and they don't offer as much control as you'd probably like. So here's a way to have a simplier and more effective set of Dodge & Burn tools, with keyboard short-cuts that will have you zipping right along to creating your masterpiece.

1. Create a new Grey Layer. Layer>New>Layer. In the next window, choose Soft Light from the Mode drop-down and check the box 'Fill with Soft-Light-Neutral color (50% grey).

2. Select the Grey Layer and choose the Brush tool. Set the brush size as needed either at the Brush tools drop down menu or with the bracket keys ( [ & ] ), and choose an appropriate softness. Set the Brush opacity to 20% to start with. Press the 'D key' to set the paint swatches to their default colors of Black & White.

3. Start Dodging & Burning with your Brush. Set the Color Swatch to Black to Darken/Burn areas of your image & White to Lighten/Dodge other areas. Raise or Lower the Brush opacity for a stronger or weaker effect - Use Keyboard short-cuts to move faster: Press the 1 - 0 keys for a quick change of Brush opacity from 10% - 100% (example: pressing 5 = 50%, 3 = 30%). Pressing the X key will toggle the Black & White swatches for even quicker Dodging & Burning tool selection.

4. Bonus Option. For those of you using Photoshop CS or above, you can make an Action for the above technique, then assign that action to one of your Function F keys. Now, anytime you'd like to Dodge & Burn an image, simply press the 'F' key that you've assigned and Photoshop will automatically make the Dodge & Burn layer, choose the default Black & White swatch colors and select a 20% brush. Don't understand how to make an Action or have other things you'd like to learn? Email me or leave a comment.

Thanks again for reading,
Tony

And Now, For Something Completely Different - 101 Photoshop Tips In 5 Min By Deke