
Whether you’re inside photographing family or outside capturing a cowboy at the rodeo, knowing how to capture motion is an important photographic skill to practice. There’s “Normal shutter speed”, then there’s “Creative shutter speeds”.
Sometimes freezing the action is what’s needed, while other times using slow shutter speeds of up to 20 seconds or longer are required to get the right effect. Here are 2.2 techniques which will help you convey or imply motion in your images to your viewers. With these 2.2 techniques, it doesn’t matter whether you want to stop the action or add blur - You’re the one in control of your image.
Tip #1) Those Silky Water Shots. This technique is one of my favorites. Be fore-warned, these require very long shutter speeds - And a tripod. Water is an integral part of many landscape images, and to be creative you need to first ask the question: Will this image look better with the water frozen in place or silky and blurred?
Most of the time, unless it’s wave crashing up over some rocks, I prefer to have my water smooth and silky. These types of shots help set a different type of mood in your landscapes.
Most of the time, unless it’s wave crashing up over some rocks, I prefer to have my water smooth and silky. These types of shots help set a different type of mood in your landscapes.
What shutter speed works best? If you’d like to get that soft water effect, start with shutter speeds around 1⁄4 to 2 sec.
Again, you’ll need a tripod at these speeds. You want everything else in the scene; bridges, docks, rocks, trees, etc. to be rock solid (pun intended). Only the water, or in the case of this train too, should show any motion.

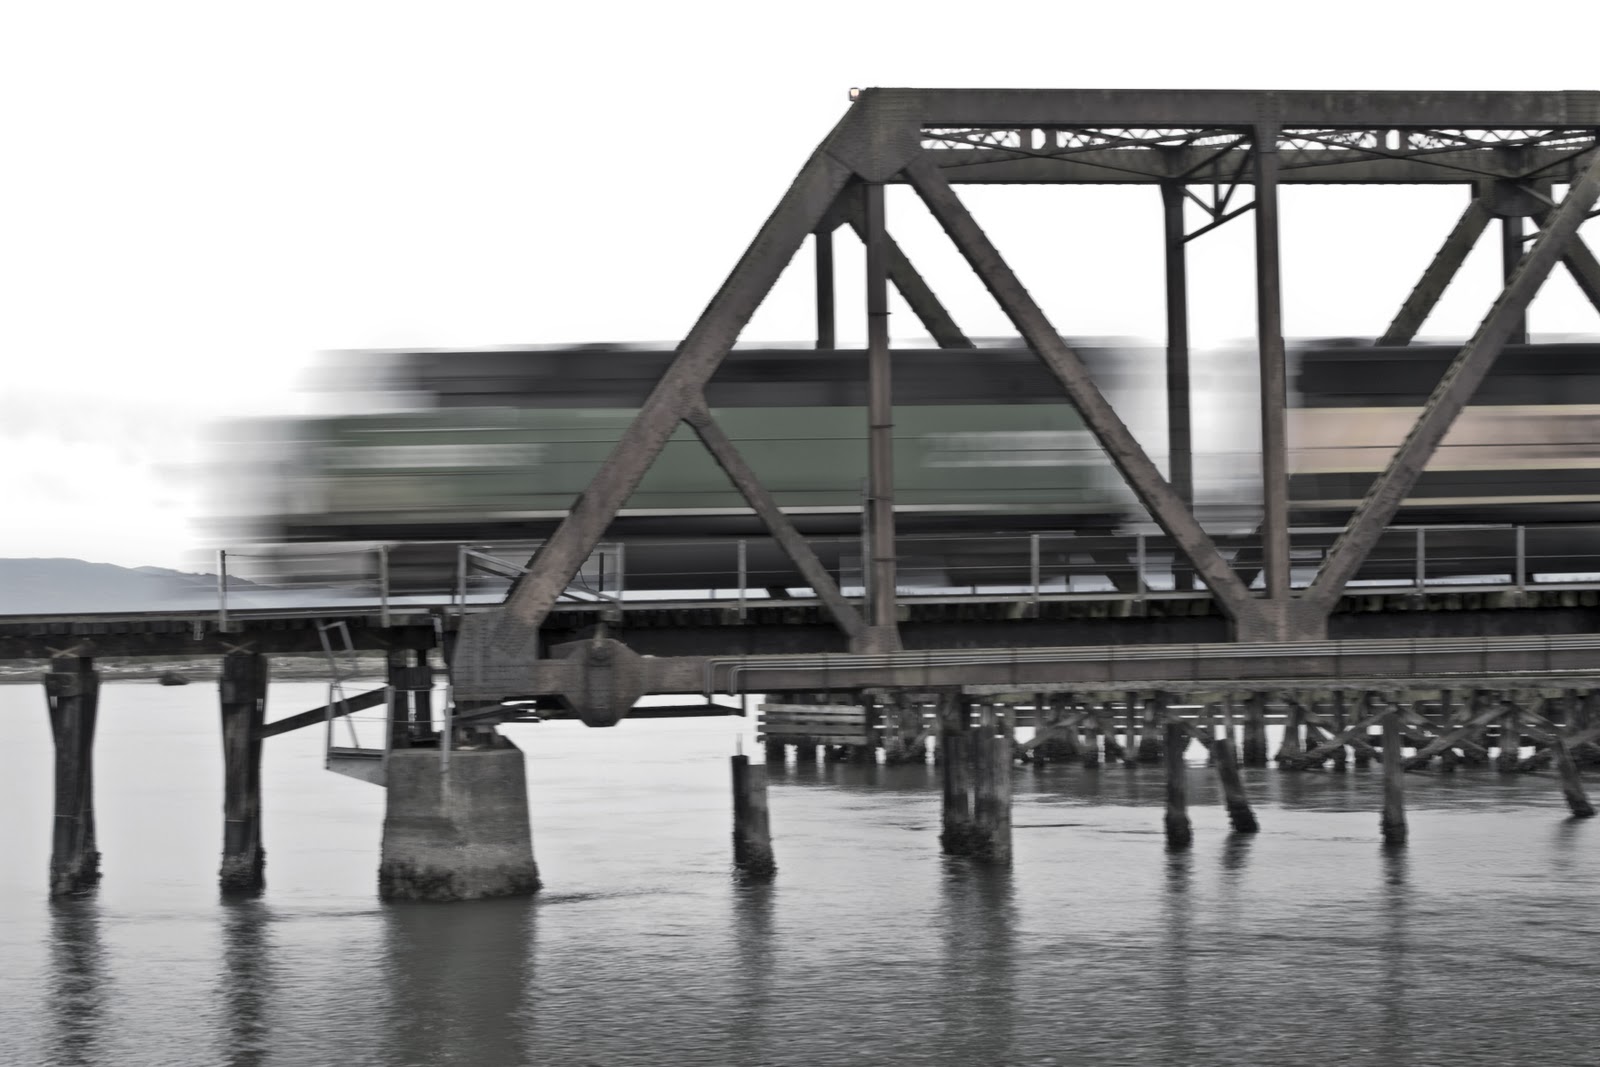
Would you believe that this train was only traveling at walking speed? With a long enough shutter speed, about 2 sec here, it looks like he's moving much faster - The magic of photography!
At these speeds your camera will still retain most of the detail and contrast in the water, it’s just going to be smoother. If you really want to have some fun, try shooting even slower, jump up to 15 to 30 seconds.
Now, in order to get these creative slower shutter speeds without creating an overly bright exposure, you’ve got to employ some other techniques to limit the amount of light that’s able to get to your sensor.
Now, in order to get these creative slower shutter speeds without creating an overly bright exposure, you’ve got to employ some other techniques to limit the amount of light that’s able to get to your sensor.
You’ve got several options. You’re first option is to set your aperture to ƒ/22 (Remember - The larger the number the smaller the aperture, the less light going to make it thru that hole). Also, if that’s not enough, adding a polarizing filter will reduce the light another one to two stops beyond that. This combination should allow for a shutter speed of around a several seconds.
This works even better on overcast, rainy days as the light levels will already be lower than sunny days - Plus, as an added bonus, your colors will be more saturated and the vegetation and rocks will have a nice wet sheen to them.
Who says you can’t have fun on rainy days? Some of my best shots are taken then. Now, when it’s pouring down and the wind’s blowing, sorry, but it’s not fun outside anymore.
OK, next. In-order to get those really, really slow speeds you see in some of those amazing images, you’ll need more help. You can add a relatively inexpensive Neutral Density (ND) filter or two to block some more of the light entering your lens. ND filters are essentially, dark grey pieces of glass which restrict light without altering colors. Depending on how much light you’d like to restrict for these slower shutter speeds, you could add incremental ND filters rated at 1, 2, or 3-stops each. Again, each stop of light reduction means one more click slower on your shutter speed settings, with each f-stop equaling half as much light as the previous setting. But - And you there was going to be a “But”, as everything has a trade off. These extra layers of possibly distorting glass, stacked on the front of your lens, may not be doing your images justice.
OK, next. In-order to get those really, really slow speeds you see in some of those amazing images, you’ll need more help. You can add a relatively inexpensive Neutral Density (ND) filter or two to block some more of the light entering your lens. ND filters are essentially, dark grey pieces of glass which restrict light without altering colors. Depending on how much light you’d like to restrict for these slower shutter speeds, you could add incremental ND filters rated at 1, 2, or 3-stops each. Again, each stop of light reduction means one more click slower on your shutter speed settings, with each f-stop equaling half as much light as the previous setting. But - And you there was going to be a “But”, as everything has a trade off. These extra layers of possibly distorting glass, stacked on the front of your lens, may not be doing your images justice.
Next option in the ‘ole tool bag. Everyone that loves long exposure photography loves the Singh-Ray Vari-ND filter. This great little toy enables you to incrementally dial in the amount of light blocked, anywhere from two to ten stops, with one (albeit slightly expensive) filter—How much blur would you like today sir?
With the Vari-ND or other ND filters, you can now photograph at speeds from 20 to 30 seconds in midday sunlight (though afternoon light looks nicer), providing those incredible silky waterfalls, streaks of clouds across the sky and other-worldly looking ocean scenes. I love the look of crashing waves for 30 seconds in the late afternoon, don’t you?
Tip #1.2) If you’ve got an iPhone, iPod Touch or maybe they’ve got one for those Android phones now too, there’s a great little Free app called “Long Time” which will calculate your exposure times for you! (Here’s the: I have no relation/interest/don’t get paid/etc. from Long Time, kinda disclosure inserted here by those fine folks somewhere in some legal dept.). You know me - More cool toys & apps. By the way, just for an odd “did you know?” - I saw somewhere that the word “app” was voted 2010 top new word of the year. Shoot, I make up new words all the time. Most by accident, via the brain not communicating with the speaking parts.
OK, here’s how to use it. Take your time and get your composition all lined up ready to shot (might was well go ahead and take a shot while you’re there in case the long exposure doesn't work), set your camera to Aperture Priority, and set your aperture for the depth-of-field you’d like, then make a note of the shutter speed your meter gives you. Switch over to Manual Mode and set the same Aperture. Whip out your “Long time” app, enter in the original shutter speed and the number of stops of ND filter you’ve added - It will now calculate the new shutter speed you’ll need. Sweet!
Now, don’t say I didn’t warn you, but there’s something else you may not have known: This was just as much an phenomenon in the good ‘ole film days as it is today, its just that the physics and the after-effects are a bit different now. There’s no need to go into the hows, whats & whys here, that’s another long boring story. It’s just that, above a couple minutes of exposure, there are a few odd things that can happen.
Don’t worry, it’s nothing drastic, nothing’s going to explode, the investigators from Fringe or the X-files won’t get called in, you won’t become sterile, and no, time does not stand still. It’s just that at these real long shutter speeds, the math may start falling apart and not produce the type of image or as an accurate an exposure as you’d expected, so you may need to experiment a bit more -
Which is all part of the fun we have in this exciting hobby we call Photography!
Now - The other fun creative use of Shutter Speed. The Action-Stopper.
Tip #2) On the other end of the scale as you pass from long exposure, thru “normal shutter speed”, you get to practice another art of motion photography - Freezing the Action, with blazing fast shutter speeds: Think 1⁄1000 sec., 1⁄2000 sec. and even higher. Your goal now is to eliminate any blur in the image, stop the motion - Many times in mid-air. This doesn’t mean eliminating the perception of motion; just eliminating blur in the shot.


In these images of birds flying and horses playing polo, although the action is stopped, there’s no doubt about motion in the image! To really stop the action, start with a shutter speed of 1⁄1000 sec. This speed should freeze most common action, but you may need to go even faster for, you guessed it - faster action. It’s going to depend on the subjects speed and how you want to convey it to your viewers.
The compromise (yes again, there’s always a compromise) is that you’ll need a large aperture opening to allow enough light in for a properly lit exposure. Now that most of the newer digital cameras are capable of improved low noise, try dialing up your ISO to 400 or 800 to gain extra speed/light.
Now, the other challange is getting sharp focus on your subject. Here are two ways to accomplish this: One option is to use your “predictive focus tracking”, which tracks your subject refocusing while you hold the shutter button down half-way (pull out the manual for your camera to look this up) or prefocus ahead of time at the point that you’d like to capture the motion. Modern cameras are amazingly accurate with their new focus tracking capabilities, so I’ll normally use either one of these methods, depending, not only on the subject, but also, which direction it’s going.
Many cameras feature a group-focusing pattern, which causes the camera to search for your subject as it moves through the frame - This can be a good thing or it could slow you down and cause you to lose the shot (as the puppy and grandkid go running by). Experiment with your camera to learn the best way to take advantage of each tool it includes. For the prefocus technique, try focusing on a spot where you know the subject will pass through, like jumping horses or motorcycles; practice on the first few that come thru, then lock that focus for the rest. If you can prefocus on the subject as they come up to the jump or point that you’d like to shot them, holding the shutter half-way until just the right moment.
Just remember - Photography is just like any other hobby, be it guitar, bike racing, dance or pottery - This will take practicing, experimenting, learning more about how your camera operates in each situation, then practicing again, experimenting some more, looking at your results (which is where digital comes in real handy - looking at your experiments right away), learn from them and experiment and practice again. Luckily the practice isn’t as boring/repetitious as piano lessons can be - I know, I’ve been there.
Oh yeah, Remember one more very important tip - HAVE FUN!!
No comments:
Post a Comment